Firefly ROC-RK3566-PC 板卡上配置 PaddleOCR v4 到 NPU 实现图片文字识别
摘要:本文记录了如何在资源极度受限的 Firefly ROC-RK3566-PC 开发板(1GB RAM + 8GB ROM, Kylin OS)上,为自研局域网聊天软件 ZFeiQ 成功部署离线中文 OCR 功能。通过 FP16 推理 + Pillow 替代 OpenCV + 极简依赖管理,在仅剩 3GB 存储空间的板子上实现了 NPU 硬件加速,中文识别准确率 > 95%,且运行时内存占用较低(约 10 MB)。
一、 挑战与最终解决方案速览
在开发 ZFeiQ 的“截图文字识别”功能时,我遇到了嵌入式 AI 部署的三个“拦路虎”:
- 存储危机:板子仅剩 3.3GB 存储。如果使用标准的
apt install python3-opencv,会拉取 X11、GTK 等数百 MB 的图形界面依赖,直接撑爆存储空间。 - 量化崩盘:标准的 INT8 量化(Quantization)需要高质量的校准数据集。如果使用简单的白底黑字图校准,NPU 运行复杂图片时会出现数值溢出,导致中文识别全是乱码。
- 内存捉襟见肘:板子 RAM 仅 1GB,UKUI 已占用大半。必须极致压缩 Python 库的运行时内存开销。
最终技术选型:
- 模型策略:放弃 INT8,改用 FP16 (半精度浮点)。RK3566 NPU 原生支持 FP16,虽比 INT8 略慢,但零精度损失,且无需校准,完美避开量化坑。
- 图像处理:主程序尽量摆脱对 OpenCV 的依赖,改用 Pillow (PIL) + Numpy,安装包仅几 MB。
- 推理引擎:使用
rknn_toolkit_lite2直接调用 NPU 硬件。
PP-OVR v3 与 ZFeiQ 联合演示:
二、 PC 端准备
为了避免在板子上进行繁重的编译工作,所有的模型转换都在 PC (WSL2 Ubuntu 20.04) 上完成。 以下略去 WSL Ubuntu 20.04.6 LTS 与 Firefly RK3566 SDK 的部署,可参照:
1. 环境安装
我们需要安装 paddle2onnx 及其依赖来导出模型,以及 rknn-toolkit2 来编译 NPU 模型。
1
2
# 1. 安装 Paddle 转换工具 (需先安装 paddlepaddle cpu 版)
pip3 install paddlepaddle paddle2onnx onnx
如何找到 rknn-toolkit2 安装包:
1
2
3
4
5
zhangzw0170@LAPTOP-5DE9621H:~/proj/firefly_rk3566_SDK/external$ find . -name "*cp38*.whl*"
./rknn-toolkit2/rknn_toolkit_lite2/packages/rknn_toolkit_lite2-1.6.0-cp38-cp38-linux_aarch64.whl
./rknn-toolkit2/rknn-toolkit2/docker/docker_file/ubuntu_20_04_cp38/rknn_toolkit2-1.6.0+81f21f4d-cp38-cp38-linux_x86_64.whl
./rknn-toolkit2/rknn-toolkit2/packages/rknn_toolkit2-1.6.0+81f21f4d-cp38-cp38-linux_x86_64.whl
zhangzw0170@LAPTOP-5DE9621H:~/proj/firefly_rk3566_SDK/external$
注意:请根据你的 PC Python 版本选择对应的 whl,这里的 cp3x 对应 Python 3.x 版本,我用的是 Python 3.8。
上面的 2 个包分别是:
- rknn_toolkit_lite2-1.6.0-cp38-cp38-linux_aarch64.whl:复制出来备用,在 3.2 节安装到板卡上用
- rknn_toolkit2-1.6.0+81f21f4d-cp38-cp38-linux_x86_64.whl:执行下面的命令安装到 WSL,这个包可以在 x64 的机子上模拟 RK3566 的 NPU 工作
1
2
# 2. 安装 RKNN 工具 (从 Firefly SDK 或瑞芯微 GitHub 获取 whl)
pip3 install rknn_toolkit2-1.6.0-cp38-cp38-linux_x86_64.whl
2. 原料获取:模型与字典
我们选择 PP-OCRv4 Slim 系列模型,体积极小且中文识别率高。
1
2
3
4
5
6
7
8
9
10
11
12
mkdir -p ~/PPOCRv4 && cd ~/PPOCRv4

# 下载检测模型 (Det)
wget https://paddleocr.bj.bcebos.com/PP-OCRv4/chinese/ch_PP-OCRv4_det_infer.tar
tar xf ch_PP-OCRv4_det_infer.tar

# 下载识别模型 (Rec)
wget https://paddleocr.bj.bcebos.com/PP-OCRv4/chinese/ch_PP-OCRv4_rec_infer.tar
tar xf ch_PP-OCRv4_rec_infer.tar

# 下载字典文件 (必需)
wget https://raw.githubusercontent.com/PaddlePaddle/PaddleOCR/release/2.6/ppocr/utils/ppocr_keys_v1.txt
查阅算子支持列表:<SDK 目录>/external/rknn-toolkit2/doc/RKNN-Toolkit2_OP_Support-1.6.0.md。
读者可能会问,为什么要在这里查?因为笔者一开始部署的是 PP-OCR v3,依赖的最低级算子库是 Opset 11,此时还没有加入 HardSmish 算子;而现在的 PP-OCR v4,依赖的最低级算子库是 Opset 14。笔者当时还觉得很遗憾,以为没办法上更新的模型,但实际上 RKNN ToolKit2 1.6.0 是支持 HardSmish 算子的。所以学会查文档真的很重要啊!!
3. 模型构建:ONNX 固化与 FP16 编译
这是最核心的一步。由于 NPU 需要固定输入形状,且我们要避开 INT8 量化的精度损失,我们编写了一个 Python 脚本 build_fp16_v4.py 来自动完成 ONNX 导出 -> Shape 修改 -> RKNN 编译 的全过程。
1
2
3
4
5
6
7
8
9
10
11
12
13
14
15
16
17
18
19
20
21
22
23
24
25
26
27
28
29
30
31
32
33
34
35
36
37
38
39
40
41
42
43
44
45
46
47
48
49
50
51
52
53
54
55
56
57
58
59
60
61
62
63
64
65
66
67
68
69
70
71
72
73
74
75
76
77
78
79
80
81
82
83
84
85
86
87
88
89
90
91
92
93
94
95
96
97
98
99
100
101
102
103
104
105
106
107
108
# build_fp16_v4.py
import onnx
from rknn.api import RKNN
import os
import sys

# --- 配置 ---
# 目标平台
PLATFORM = 'rk3566'
# 输出文件夹
OUT_DIR = './build_output'

# 检测模型输入尺寸 (960x960)
DET_SHAPE = [1, 3, 960, 960]
# 识别模型输入尺寸 (标准值为 1, 3, 48, 320)
# 此处加大识别尺寸是为了处理单行长文本
REC_SHAPE = [1, 3, 48, 640]

def fix_onnx_shape(src_path, dst_path, input_shape):
    """
    彻底固化 ONNX 维度,包括 Batch Size
    """
    print(f"--> Fixing shape for {src_path} to {input_shape}...")
    if not os.path.exists(src_path):
        print(f"Error: Source file {src_path} not found!")
        sys.exit(1)

    model = onnx.load(src_path)
    input_tensor = model.graph.input[0]

    # 1. 强制修改所有维度 (Batch, Channel, Height, Width)
    for i in range(4):
        input_tensor.type.tensor_type.shape.dim[i].dim_value = input_shape[i]

    # 2. 清除动态参数名 (dim_param),防止干扰
    for i in [0, 2, 3]:
        if input_tensor.type.tensor_type.shape.dim[i].dim_param:
            input_tensor.type.tensor_type.shape.dim[i].dim_param = ""

    onnx.save(model, dst_path)
    print(f"    Saved static model to {dst_path}")

def build_rknn(onnx_path, rknn_path, mean_values, std_values):
    print(f"--> Building RKNN: {rknn_path}")
    rknn = RKNN(verbose=False)
    rknn.config(mean_values=[mean_values], std_values=[std_values], target_platform=PLATFORM)

    # 加载
    if rknn.load_onnx(model=onnx_path) != 0:
        print('Load ONNX failed!')
        sys.exit(1)

    # 构建 (FP16 模式,关闭量化)
    print('--> Building (FP16 Mode)...')
    if rknn.build(do_quantization=False) != 0:
        print('Build RKNN failed!')
        sys.exit(1)

    # 导出
    if rknn.export_rknn(rknn_path) != 0:
        print('Export RKNN failed!')
        sys.exit(1)
    print('    Success!')

if __name__ == '__main__':
    # 0. 准备输出目录
    if not os.path.exists(OUT_DIR):
        os.makedirs(OUT_DIR)
        print(f"Created output directory: {OUT_DIR}")

    # 定义所有文件路径
    det_dynamic_path = os.path.join(OUT_DIR, 'ocr_det_dynamic.onnx')
    det_static_path  = os.path.join(OUT_DIR, 'ocr_det_static.onnx')
    det_rknn_path    = os.path.join(OUT_DIR, 'ocr_det_rk3566_v4.rknn')

    rec_dynamic_path = os.path.join(OUT_DIR, 'ocr_rec_dynamic.onnx')
    rec_static_path  = os.path.join(OUT_DIR, 'ocr_rec_static.onnx')
    rec_rknn_path    = os.path.join(OUT_DIR, 'ocr_rec_rk3566_v4.rknn')

    # 1. 导出动态 ONNX (如果不存在)
    if not os.path.exists(det_dynamic_path):
	# 需要 Opset >= 14 以支持 HardSwish 算子
        print("Exporting Det dynamic ONNX...")
        cmd = (f"paddle2onnx --model_dir ./ch_PP-OCRv4_det_infer "
               f"--model_filename inference.pdmodel --params_filename inference.pdiparams "
               f"--save_file {det_dynamic_path} --opset_version 14 --enable_onnx_checker True")
        os.system(cmd)

    if not os.path.exists(rec_dynamic_path):
        print("Exporting Rec dynamic ONNX...")
        cmd = (f"paddle2onnx --model_dir ./ch_PP-OCRv4_rec_infer "
               f"--model_filename inference.pdmodel --params_filename inference.pdiparams "
               f"--save_file {rec_dynamic_path} --opset_version 11 --enable_onnx_checker True")
        os.system(cmd)

    # 2. 处理检测模型 (Det)
    fix_onnx_shape(det_dynamic_path, det_static_path, DET_SHAPE)
    build_rknn(det_static_path, det_rknn_path,
               mean_values=[123.675, 116.28, 103.53],
               std_values=[58.395, 57.12, 57.375])

    # 3. 处理识别模型 (Rec)
    fix_onnx_shape(rec_dynamic_path, rec_static_path, REC_SHAPE)
    build_rknn(rec_static_path, rec_rknn_path,
               mean_values=[127.5, 127.5, 127.5],
               std_values=[127.5, 127.5, 127.5])

    print(f"\nAll done! Check {OUT_DIR} for generated files.")
4. 测试图片准备
以下脚本可用于生成测试图片:
1
2
3
4
5
6
7
8
9
10
11
12
13
14
15
16
17
18
19
20
21
22
23
24
25
26
27
28
29
30
31
32
33
34
35
36
37
38
39
40
41
42
43
44
45
46
47
48
49
50
51
52
53
54
55
# gen_test_img.py
import cv2
import numpy as np
from PIL import Image, ImageDraw, ImageFont
import os

# 图片保存路径
SAVE_PATH = "test.jpg"

def create_demo_image():
    # 1. 创建一张白色的背景图 (H, W, C)
    # 为了更接近真实场景,我们给它设大一点,比如 800x800
    width, height = 800, 800
    img_pil = Image.new("RGB", (width, height), (255, 255, 255))
    draw = ImageDraw.Draw(img_pil)

    # 2. 设置字体
    # WSL2 可以直接访问 Windows 的字体目录
    # 尝试加载黑体 (SimHei),如果没有则尝试微软雅黑
    font_path = "/mnt/c/Windows/Fonts/simhei.ttf"
    if not os.path.exists(font_path):
        font_path = "/mnt/c/Windows/Fonts/msyh.ttc"

    try:
        # 字号设大一点,方便 OCR 识别
        font = ImageFont.truetype(font_path, 40)
    except Exception as e:
        print(f"Error loading font from {font_path}: {e}")
        print("Trying default font (Chinese might fail)...")
        font = ImageFont.load_default()

    # 3. 要写入的文字内容
    texts = [
        "PaddlerOCR by ZFeiQ:",
        "Hello Neural Processing Unit NPU !!!",
        "!@#$%^&*()",
        "你好!神经处理单元!",
        "你好!麒麟类飞秋软件!"
    ]

    # 4. 绘制文字
    x, y = 50, 50
    text_color = (0, 0, 0) # 黑色

    for line in texts:
        draw.text((x, y), line, font=font, fill=text_color)
        y += 60 # 行间距

    # 5. 保存图片
    img_pil.save(SAVE_PATH)
    print(f"Success! Image saved to: {SAVE_PATH}")

if __name__ == "__main__":
    create_demo_image()
生成的测试图片效果: 
5. 检查文件
本阶段完成后目录下的文件:
1
2
3
4
5
6
7
8
9
10
11
12
13
14
15
16
17
18
19
20
21
22
zhangzw0170@LAPTOP-5DE9621H:~/proj/PPOCRv4$ tree ~/proj/PPOCRv4
/home/zhangzw0170/proj/PPOCRv4
├── build_fp16_v4.py
├── build_output
│   ├── ocr_det_dynamic.onnx
│   ├── ocr_det_rk3566_v4.rknn
│   ├── ocr_det_static.onnx
│   ├── ocr_rec_dynamic.onnx
│   ├── ocr_rec_rk3566_v4.rknn
│   └── ocr_rec_static.onnx
├── ch_PP-OCRv4_det_infer
│   ├── inference.pdiparams
│   ├── inference.pdiparams.info
│   └── inference.pdmodel
├── ch_PP-OCRv4_det_infer.tar
├── ch_PP-OCRv4_rec_infer
│   ├── inference.pdiparams
│   ├── inference.pdiparams.info
│   └── inference.pdmodel
├── ch_PP-OCRv4_rec_infer.tar
├── ppocr_keys_v1.txt
└── test.jpg
三、 板端环境部署
这是板子上的最终环境清单。我们将 ZFeiQ 的基础依赖和 OCR 的新增依赖合并,力求最小化。
1. requirements.txt 清单
1
2
3
4
5
6
7
8
9
10
11
12
13
14
# --- ZFeiQ 基础通信依赖 ---
# 两个密码学库,任选其一即可,推荐第一个
cryptography>=42.0
pycryptodome>=3.19

# --- OCR 新增轻量化依赖 ---
pillow              # 替代 OpenCV 进行图像读取与缩放 (仅几 MB)
numpy               # 矩阵运算
pyclipper           # 后处理:文本框多边形计算
shapely             # 后处理:几何计算
opencv-python       # 【妥协】仅用于 utils 内部数学计算 (pip安装,不走apt,不带GUI依赖)

# --- NPU 驱动 ---
# rknn_toolkit_lite2 (通过官方 whl 文件安装)
2. 安装命令
在 RK3566 上执行以下命令,避免使用 apt 安装庞大的 python3-opencv:
1
2
# 1. 安装 Python 库 (使用 pip 安装 opencv-python 以避免拉取 X11 依赖)
pip3 install pillow numpy pyclipper shapely opencv-python cryptography pycryptodome
安装刚才准备好的 RKNN Toolkit 2 库: (忘掉了?点这里)
1
2
3
# 2. 安装 NPU 驱动 (从 Firefly SDK 获取的 whl)
# 请根据板子 Python 版本选择对应的 whl
pip3 install rknn_toolkit_lite2-1.6.0-cp38-cp38-linux_aarch64.whl
四、 PC 端模拟与板端测试
1. 提取 SDK 后处理代码
PaddleOCR 的后处理逻辑复杂,我们需要从瑞芯微的 rknn_model_zoo 中提取官方实现。 注意:必须从 PPOCR-System 路径下提取,否则会导致 API 不兼容。
1
2
3
4
# 下载 RKNN 算法示例库
git clone https://github.com/airockchip/rknn_model_zoo.git
# 提取 OCR 后处理需要的 db_postprocess.py 等核心代码
cp -r ./rknn_model_zoo/examples/PPOCR/PPOCR-System/python/utils
2. PC 端模拟脚本
1
2
3
4
5
6
7
8
9
10
11
12
13
14
15
16
17
18
19
20
21
22
23
24
25
26
27
28
29
30
31
32
33
34
35
36
37
38
39
40
41
42
43
44
45
46
47
48
49
50
51
52
53
54
55
56
57
58
59
60
61
62
63
64
65
66
67
68
69
70
71
72
73
74
75
76
77
78
79
80
81
82
83
84
85
86
87
88
89
90
91
92
93
94
95
96
97
98
99
100
101
102
103
104
105
106
107
108
109
110
111
112
113
114
115
116
117
118
119
120
121
122
123
124
125
126
127
128
129
130
131
132
133
134
135
136
137
138
139
140
141
142
143
144
145
146
147
148
149
150
151
152
153
154
155
156
157
158
159
160
161
# simulate.py
import os
import sys
import argparse
import numpy as np
from PIL import Image

# --- 强力静音工具 ---
class HiddenPrints:
    def __init__(self, activated=True):
        self.activated = activated
        self._original_stdout = None
        self._original_stderr = None

    def __enter__(self):
        if self.activated:
            self._original_stdout = sys.stdout
            self._original_stderr = sys.stderr
            sys.stdout = open(os.devnull, 'w')
            sys.stderr = open(os.devnull, 'w')
            try:
                self._stdout_fd = self._original_stdout.fileno()
                self._stderr_fd = self._original_stderr.fileno()
                self._saved_stdout_fd = os.dup(self._stdout_fd)
                self._saved_stderr_fd = os.dup(self._stderr_fd)
                os.dup2(sys.stdout.fileno(), self._stdout_fd)
                os.dup2(sys.stderr.fileno(), self._stderr_fd)
            except Exception:
                pass

    def __exit__(self, exc_type, exc_val, exc_tb):
        if self.activated:
            try:
                os.dup2(self._saved_stdout_fd, self._stdout_fd)
                os.dup2(self._saved_stderr_fd, self._stderr_fd)
                os.close(self._saved_stdout_fd)
                os.close(self._saved_stderr_fd)
            except Exception:
                pass
            sys.stdout = self._original_stdout
            sys.stderr = self._original_stderr

# 解析参数
parser = argparse.ArgumentParser()
parser.add_argument('--debug', action='store_true', help='Show detailed logs')
args = parser.parse_args()

if args.debug:
    os.environ['RKNN_LOG_LEVEL'] = '3'
else:
    os.environ['RKNN_LOG_LEVEL'] = '0'

from rknn.api import RKNN
from utils.db_postprocess import DBPostProcess
from utils.rec_postprocess import CTCLabelDecode

# 【注意】请确保这里指向的是 v4 版本的静态 ONNX 文件
DET_MODEL_PATH = './build_output/ocr_det_static.onnx'
REC_MODEL_PATH = './build_output/ocr_rec_static.onnx'
KEY_PATH = './ppocr_keys_v1.txt'
IMG_PATH = './test.jpg'

def init_model(path, model_type, verbose=False):
    if verbose: print(f"Loading {path}...")
    rknn = RKNN(verbose=verbose)

    # 预处理配置保持与 v3 一致 (Paddle 默认)
    if model_type == 'det':
        rknn.config(mean_values=[[123.675, 116.28, 103.53]],
                    std_values=[[58.395, 57.12, 57.375]],
                    target_platform='rk3566')
    else:
        rknn.config(mean_values=[[127.5, 127.5, 127.5]],
                    std_values=[[127.5, 127.5, 127.5]],
                    target_platform='rk3566')

    ret = rknn.load_onnx(model=path)
    if ret != 0: print(f"Load {path} failed!"); sys.exit(1)

    ret = rknn.build(do_quantization=False)
    if ret != 0: print("Build failed!"); sys.exit(1)

    ret = rknn.init_runtime(target=None)
    if ret != 0: print("Init runtime failed!"); sys.exit(1)
    return rknn

def main():
    msg_prefix = "[Sim v4]"
    if not args.debug:
        print(f"{msg_prefix} Quiet Mode ON. Initializing models (960x960 / 640x48)...")

    with HiddenPrints(activated=not args.debug):
        det_model = init_model(DET_MODEL_PATH, 'det', verbose=args.debug)
        rec_model = init_model(REC_MODEL_PATH, 'rec', verbose=args.debug)

    # 【参数调整】v4 模型检测能力更强,可以适当调高 box_thresh
    post_det = DBPostProcess(thresh=0.3, box_thresh=0.6, unclip_ratio=1.5)
    post_rec = CTCLabelDecode(character_dict_path=KEY_PATH, use_space_char=True)

    if not os.path.exists(IMG_PATH):
        print(f"Error: {IMG_PATH} not found.")
        return

    img_pil = Image.open(IMG_PATH).convert("RGB")
    img = np.array(img_pil)
    h, w = img.shape[:2]

    # ==========================
    # 3. Detection (960x960)
    # ==========================
    # 【关键修改】Det 输入尺寸改为 960x960
    img_det_pil = img_pil.resize((960, 960), Image.BILINEAR)
    img_det = np.array(img_det_pil)
    img_det = img_det[np.newaxis, ...]

    with HiddenPrints(activated=not args.debug):
        outputs = det_model.inference(inputs=[img_det], data_format='nhwc')

    # 【关键修改】计算比例时使用 960
    ratio_h = 960 / float(h)
    ratio_w = 960 / float(w)

    det_results = post_det({'maps': outputs[0]}, [[h, w, ratio_h, ratio_w]])
    dt_boxes = det_results[0]['points']

    print(f"{msg_prefix} Found {len(dt_boxes)} boxes.")

    # ==========================
    # 4. Recognition (640x48)
    # ==========================
    for i, box in enumerate(dt_boxes):
        box = sorted(box, key=lambda x: x[0])
        x_min = int(min([p[0] for p in box]))
        x_max = int(max([p[0] for p in box]))
        y_min = int(min([p[1] for p in box]))
        y_max = int(max([p[1] for p in box]))

        crop_img = img[y_min:y_max, x_min:x_max]
        if crop_img.size == 0: continue

        crop_pil = Image.fromarray(crop_img)

        # 【关键修改】Rec 输入尺寸改为 640x48
        img_rec_pil = crop_pil.resize((640, 48), Image.BILINEAR)
        img_rec = np.array(img_rec_pil)
        img_rec = img_rec[np.newaxis, ...]

        with HiddenPrints(activated=not args.debug):
            outputs = rec_model.inference(inputs=[img_rec], data_format='nhwc')

        rec_res = post_rec(outputs[0])
        if rec_res and len(rec_res) > 0:
            text, score = rec_res[0]
            print(f"   Box {i}: '{text}' (Conf: {score:.2f})")

    det_model.release()
    rec_model.release()
    print(f"{msg_prefix} Done.")

if __name__ == '__main__':
    main()
PC 端模拟结果:
1
2
3
4
5
6
7
8
9
zhangzw0170@LAPTOP-5DE9621H:~/proj/PPOCRv4$ python3 simulate.py
[Sim v4] Quiet Mode ON. Initializing models (960x960 / 640x48)...
[Sim v4] Found 5 boxes.
   Box 0: '你好!麒麟类飞秋软件!' (Conf: 0.99)
   Box 1: '你好!神经处理单元!' (Conf: 0.99)
   Box 2: '!@#$%&*' (Conf: 0.96)
   Box 3: 'Hello Neural Processing Unit NPU !!!' (Conf: 1.00)
   Box 4: 'PaddlerOCRbyZFeiQ:' (Conf: 0.96)
[Sim v4] Done.
与图片比较:跳转到图片
若需要更详细的输出,可使用
python3 simulate.py --debug。
可以看到,中文与英文的识别结果非常准确,且置信度很高,不过还是有些瑕疵,比如 Box 2 最后的一对括号没有识别出来,Box 4 的文字没有空格。
3. 板卡端测试脚本
1
2
3
4
5
6
7
8
9
10
11
12
13
14
15
16
17
18
19
20
21
22
23
24
25
26
27
28
29
30
31
32
33
34
35
36
37
38
39
40
41
42
43
44
45
46
47
48
49
50
51
52
53
54
55
56
57
58
59
60
61
62
63
64
65
66
67
68
69
70
71
72
73
74
75
76
77
78
79
80
81
82
83
84
85
86
87
88
89
90
91
92
93
94
95
96
97
98
99
100
101
102
103
104
105
106
107
108
109
110
111
112
113
114
# main.py
import os
import sys
import argparse
import numpy as np
from PIL import Image
from rknnlite.api import RKNNLite

from utils.db_postprocess import DBPostProcess
from utils.rec_postprocess import CTCLabelDecode

# 【关键】修改为 v4 模型路径
DET_MODEL_PATH = './build_output/ocr_det_rk3566_v4.rknn'
REC_MODEL_PATH = './build_output/ocr_rec_rk3566_v4.rknn'
KEY_PATH = './ppocr_keys_v1.txt'
IMG_PATH = './test.jpg'

def init_model(path, verbose=False):
    if verbose: print(f"Loading {path}...")
    rknn = RKNNLite(verbose=verbose)

    ret = rknn.load_rknn(path)
    if ret != 0: print(f"Load {path} failed!"); sys.exit(ret)

    # RK3566 单核 NPU,无需 core_mask
    ret = rknn.init_runtime()
    if ret != 0: print("Init runtime failed"); sys.exit(ret)
    return rknn

def main():
    parser = argparse.ArgumentParser()
    parser.add_argument('--debug', action='store_true', help='Show detailed logs')
    args = parser.parse_args()

    if args.debug:
        os.environ['RKNN_LOG_LEVEL'] = '3'
    else:
        os.environ['RKNN_LOG_LEVEL'] = '0'

    msg_prefix = "[Board v4]"
    if not args.debug:
        print(f"{msg_prefix} Running OCR (960x960 / 640x48)...")

    det_model = init_model(DET_MODEL_PATH, verbose=args.debug)
    rec_model = init_model(REC_MODEL_PATH, verbose=args.debug)

    # Det 后处理参数
    post_det = DBPostProcess(thresh=0.3, box_thresh=0.5, unclip_ratio=1.5)
    # Rec 后处理参数
    post_rec = CTCLabelDecode(character_dict_path=KEY_PATH, use_space_char=True)

    if not os.path.exists(IMG_PATH):
        print("Error: Image not found!")
        return

    img_pil = Image.open(IMG_PATH).convert("RGB")
    img = np.array(img_pil)
    h, w = img.shape[:2]

    # ==========================
    # 3. Detection (960x960)
    # ==========================
    # 【关键修改】Det 输入尺寸改为 960
    img_det_pil = img_pil.resize((960, 960), Image.BILINEAR)
    img_det = np.array(img_det_pil)
    img_det = img_det[np.newaxis, ...]

    # 【关键修改】指定 data_format='nhwc'
    outputs = det_model.inference(inputs=[img_det], data_format='nhwc')

    # 【关键修改】比例计算基数改为 960
    ratio_h = 960 / float(h)
    ratio_w = 960 / float(w)

    # 适配新版 API:使用字典和双层列表传参
    det_results = post_det({'maps': outputs[0]}, [[h, w, ratio_h, ratio_w]])
    dt_boxes = det_results[0]['points']

    print(f" -> Found {len(dt_boxes)} boxes.")

    # ==========================
    # 4. Recognition (640x48)
    # ==========================
    for i, box in enumerate(dt_boxes):
        box = sorted(box, key=lambda x: x[0])
        x_min = int(min([p[0] for p in box]))
        x_max = int(max([p[0] for p in box]))
        y_min = int(min([p[1] for p in box]))
        y_max = int(max([p[1] for p in box]))

        crop_img = img[y_min:y_max, x_min:x_max]
        if crop_img.size == 0: continue

        crop_pil = Image.fromarray(crop_img)

        # 【关键修改】Rec 输入宽度改为 640
        img_rec_pil = crop_pil.resize((640, 48), Image.BILINEAR)
        img_rec = np.array(img_rec_pil)
        img_rec = img_rec[np.newaxis, ...]

        # 【关键修改】指定 data_format='nhwc'
        outputs = rec_model.inference(inputs=[img_rec], data_format='nhwc')

        rec_res = post_rec(outputs[0])
        if rec_res and len(rec_res) > 0:
            text, score = rec_res[0]
            print(f"   Box {i}: '{text}' (Conf: {score:.2f})")

    det_model.release()
    rec_model.release()
    if not args.debug: print("Done.")

if __name__ == '__main__':
    main()
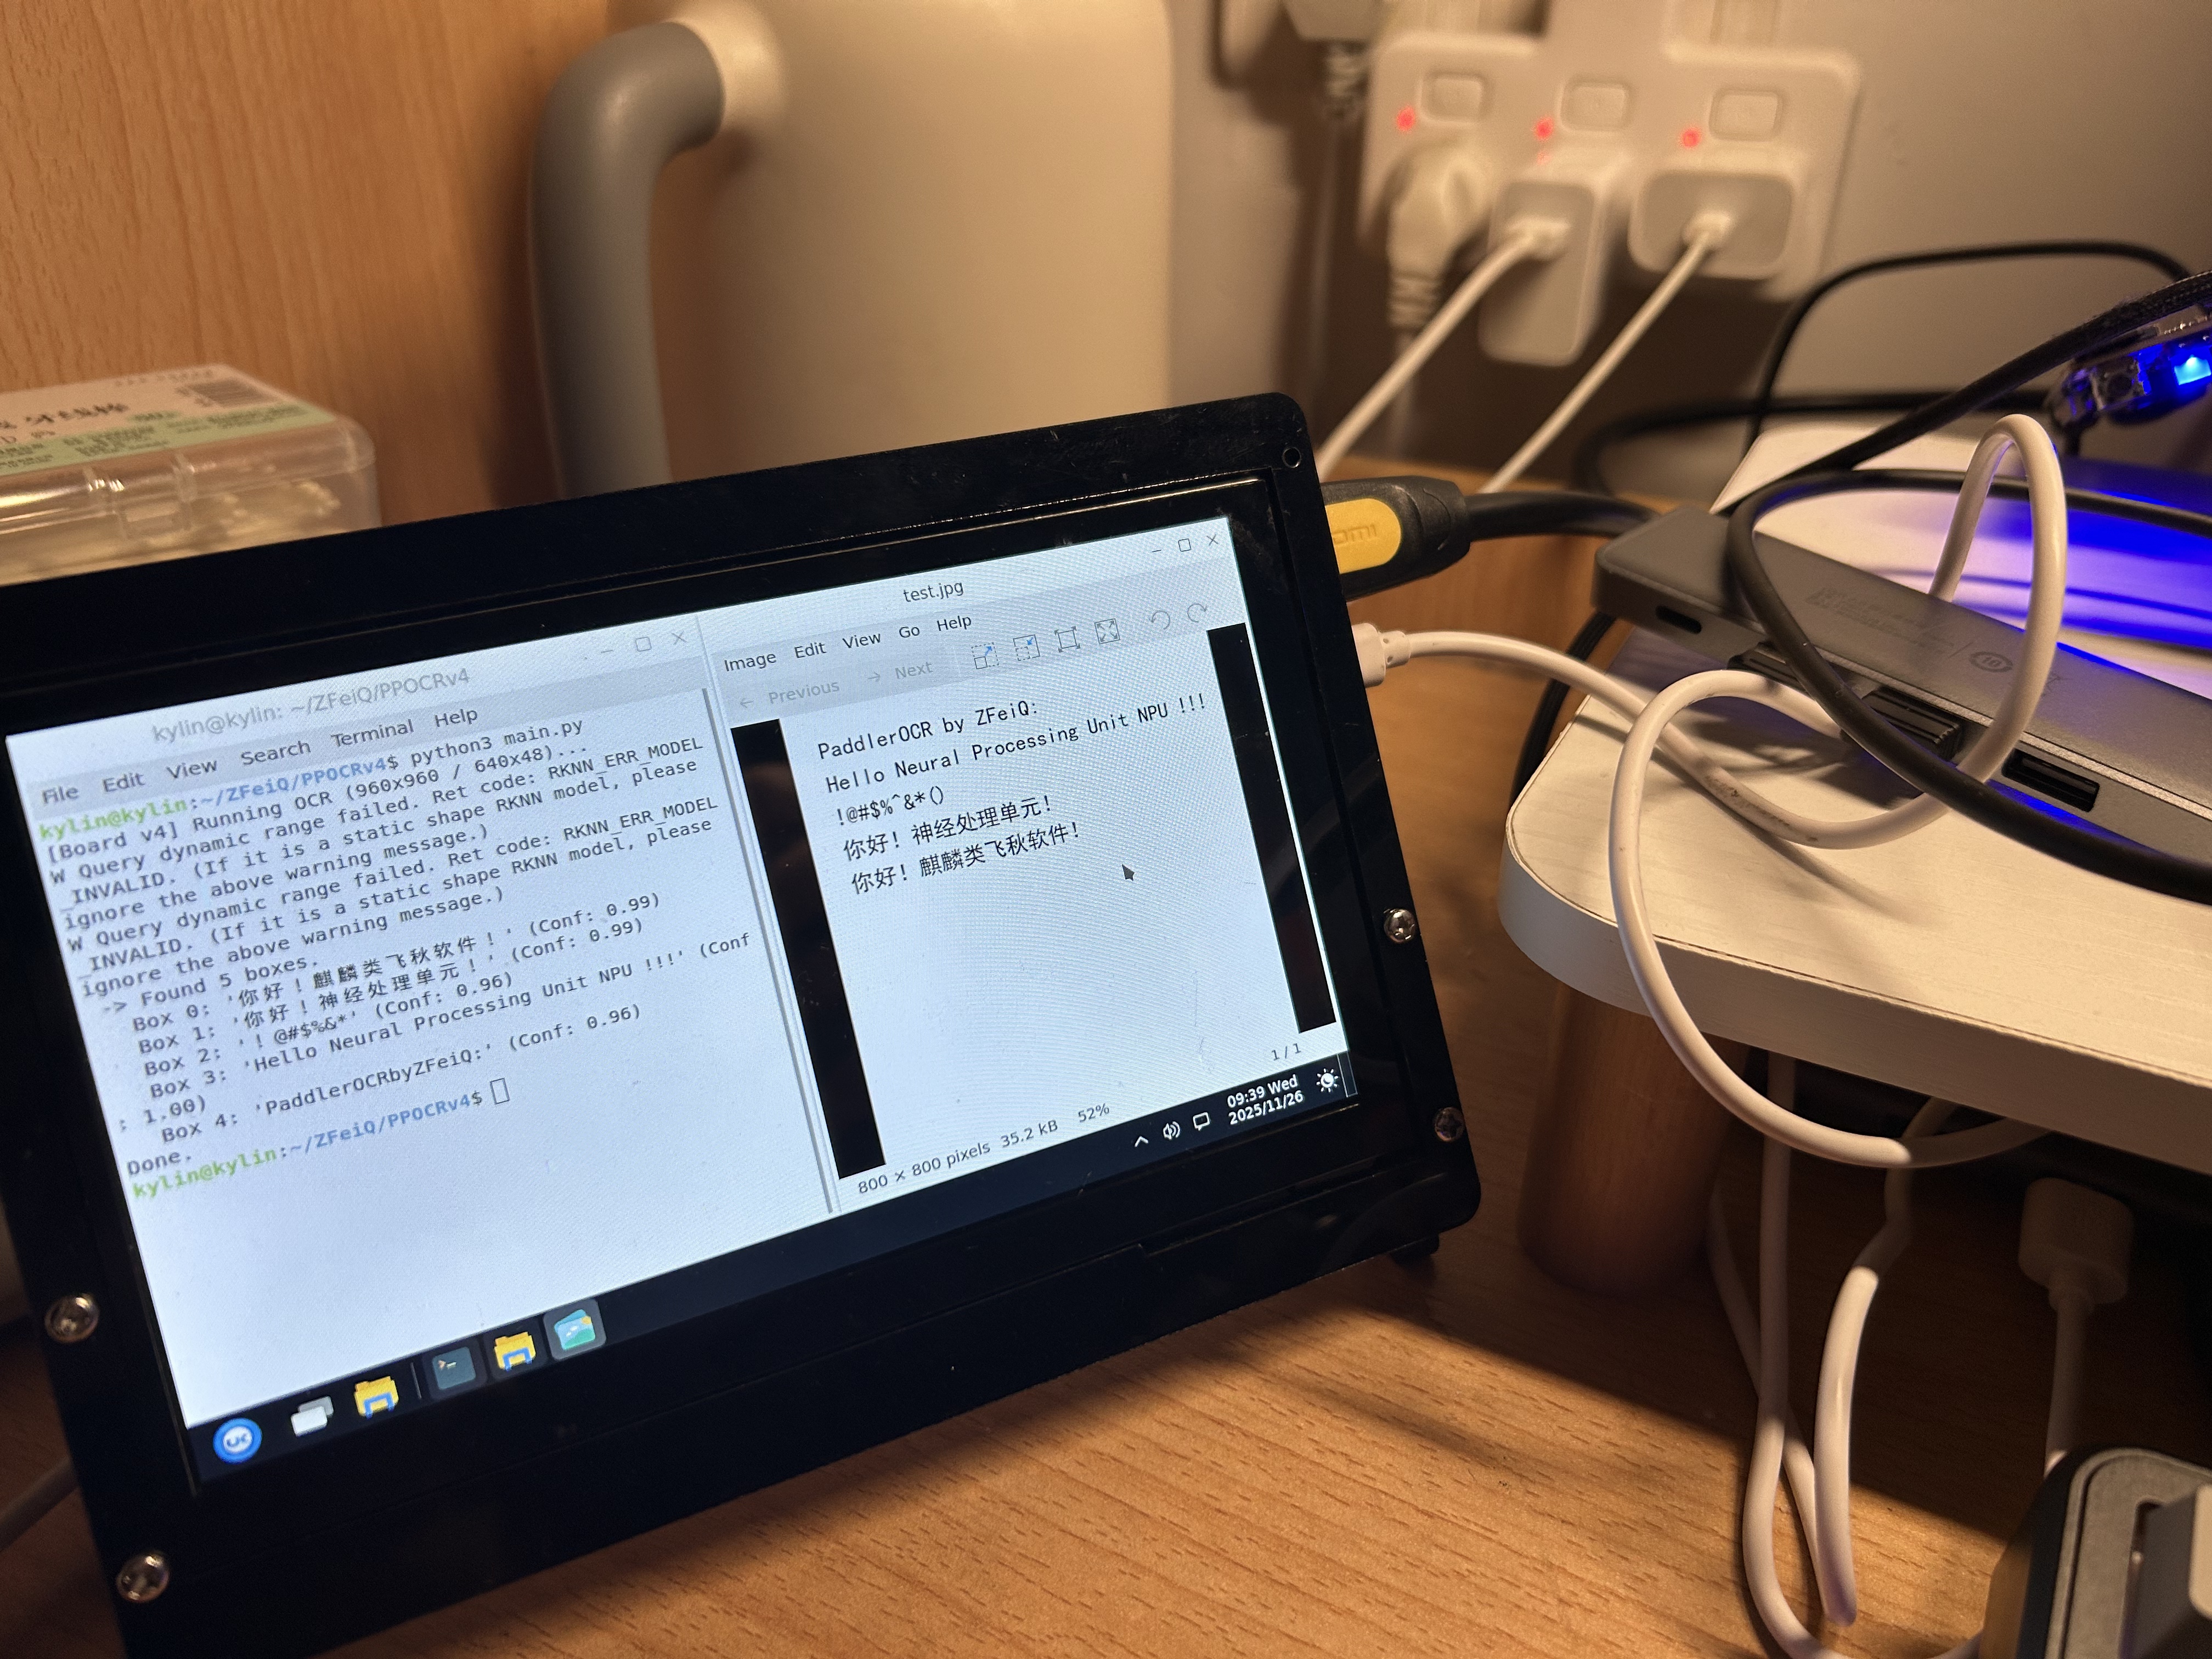
板卡端运行结果:
1
2
3
4
5
6
7
8
9
10
11
kylin@kylin:~/ZFeiQ/PPOCRv4$ python3 main.py
[Board v4] Running OCR (960x960 / 640x48)...
W Query dynamic range failed. Ret code: RKNN_ERR_MODEL_INVALID. (If it is a static shape RKNN model, please ignore the above warning message.)
W Query dynamic range failed. Ret code: RKNN_ERR_MODEL_INVALID. (If it is a static shape RKNN model, please ignore the above warning message.)
 -> Found 5 boxes.
   Box 0: '你好!麒麟类飞秋软件!' (Conf: 0.99)
   Box 1: '你好!神经处理单元!' (Conf: 0.99)
   Box 2: '!@#$%&*' (Conf: 0.96)
   Box 3: 'Hello Neural Processing Unit NPU !!!' (Conf: 1.00)
   Box 4: 'PaddlerOCRbyZFeiQ:' (Conf: 0.96)
Done.
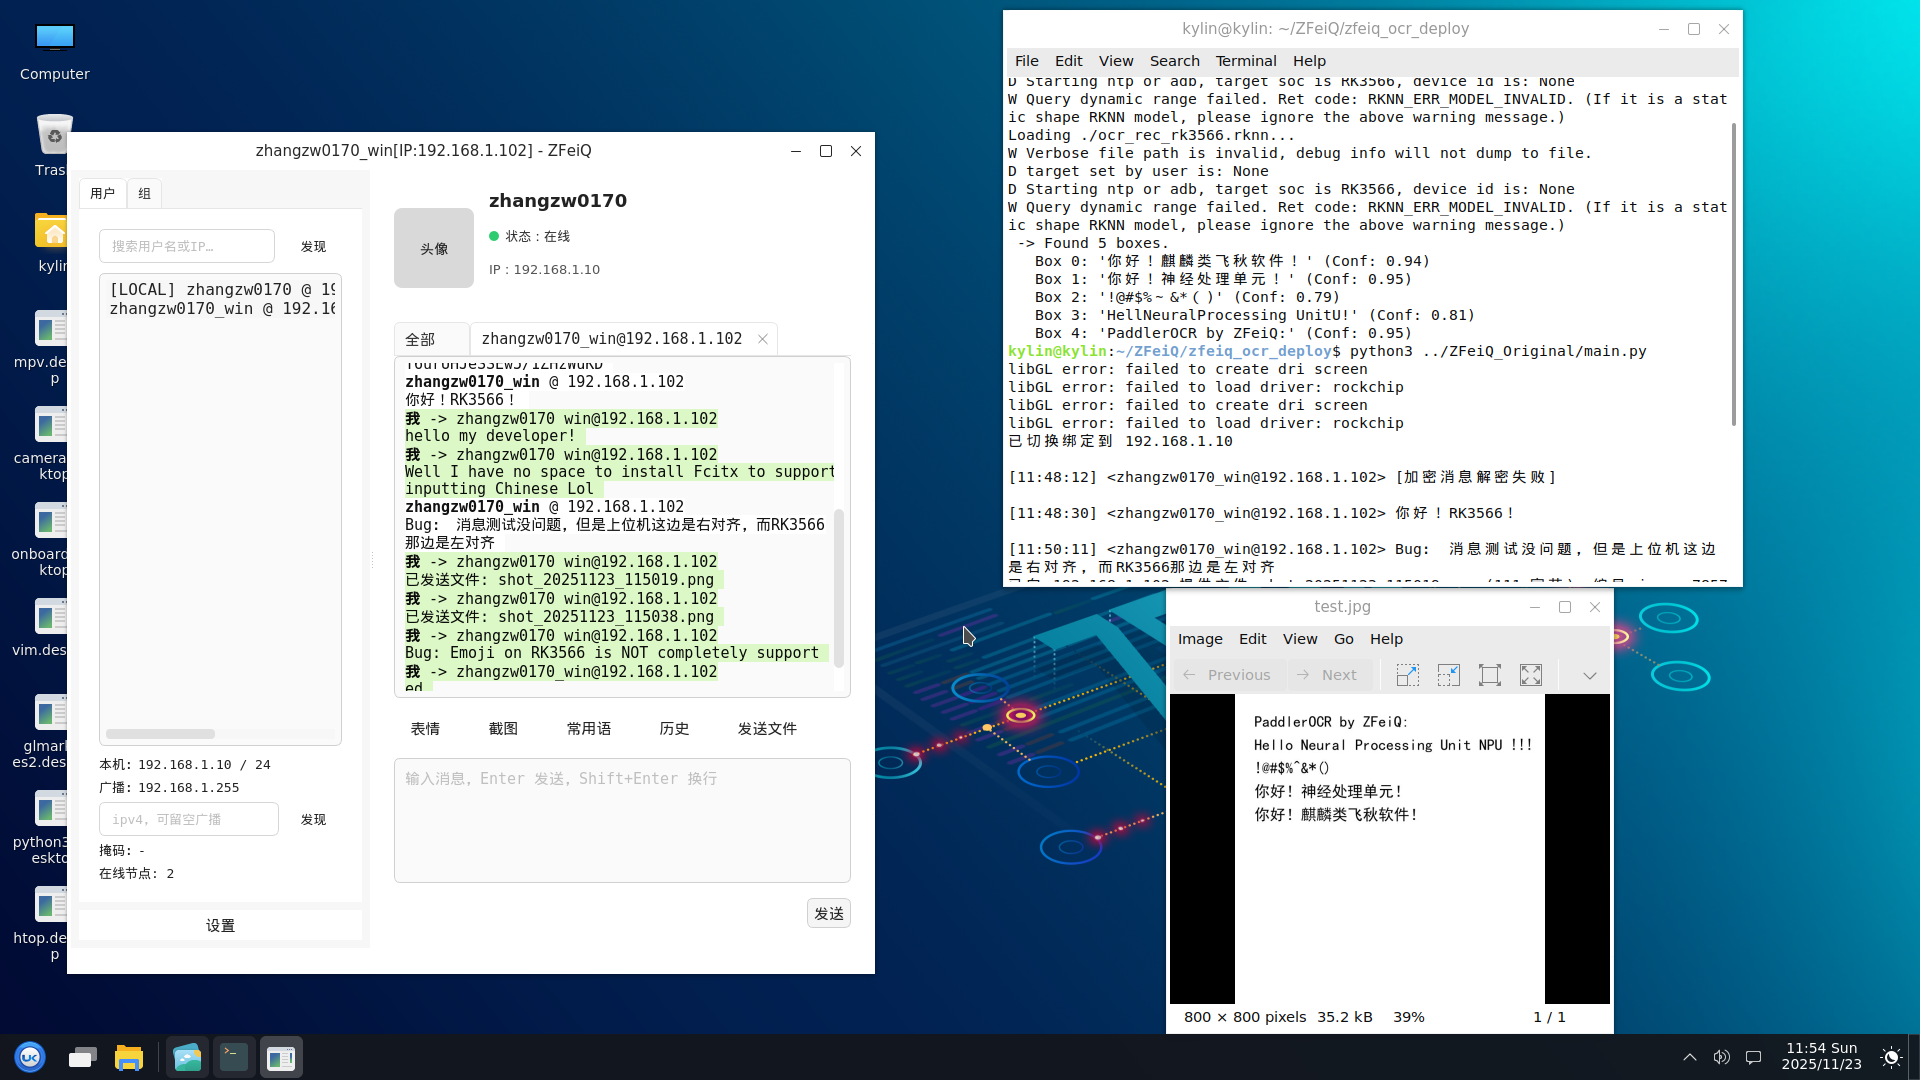
可以看到,实际运行结果与 PC 端仿真结果相当符合,结果喜人。
五、 PPOCR v4 与 v3 的识别比较
为了验证升级效果,我对比了 优化后的 v4 模型 与 默认配置的 v3 模型。
1. PP-OCR v4 (本方案)
- 配置:FP16, Det: 960x960, Rec: 640x48 (宽视野)
- 表现:长英文
Hello Neural...识别完美,无字符粘连;中文置信度均在 0.99 左右。 - 日志:
1
2
3
4
5
6
7
8
9
10
11
kylin@kylin:~/ZFeiQ/PPOCRv4$ python3 main.py
[Board v4] Running OCR (960x960 / 640x48)...
W Query dynamic range failed. Ret code: RKNN_ERR_MODEL_INVALID. (If it is a static shape RKNN model, please ignore the above warning message.)
W Query dynamic range failed. Ret code: RKNN_ERR_MODEL_INVALID. (If it is a static shape RKNN model, please ignore the above warning message.)
 -> Found 5 boxes.
 Box 0: '你好!麒麟类飞秋软件!' (Conf: 0.99)
 Box 1: '你好!神经处理单元!' (Conf: 0.99)
 Box 2: '!@#$%&*' (Conf: 0.96)
 Box 3: 'Hello Neural Processing Unit NPU !!!' (Conf: 1.00)
 Box 4: 'PaddlerOCRbyZFeiQ:' (Conf: 0.96)
Done.
2. PP-OCR v3 (旧方案对照)
- 配置:FP16, Det: 640x640, Rec: 320x48 (标准视野)
- 表现:受限于 320 像素宽度,长文本被横向挤压,导致识别丢失字符(
HellNeural...)。 - 日志:
1
2
3
4
5
6
7
8
9
10
11
12
13
14
15
16
17
kylin@kylin:~/ZFeiQ/zfeiq_ocr_deploy$ python3 main.py --debug
Loading ./ocr_det_rk3566.rknn...
W Verbose file path is invalid, debug info will not dump to file.
D target set by user is: None
D Starting ntp or adb, target soc is RK3566, device id is: None
W Query dynamic range failed. Ret code: RKNN_ERR_MODEL_INVALID. (If it is a static shape RKNN model, please ignore the above warning message.)
Loading ./ocr_rec_rk3566.rknn...
W Verbose file path is invalid, debug info will not dump to file.
D target set by user is: None
D Starting ntp or adb, target soc is RK3566, device id is: None
W Query dynamic range failed. Ret code: RKNN_ERR_MODEL_INVALID. (If it is a static shape RKNN model, please ignore the above warning message.)
 -> Found 5 boxes.
 Box 0: '你好!麒麟类飞秋软件!' (Conf: 0.94)
 Box 1: '你好!神经处理单元!' (Conf: 0.95)
 Box 2: '!@#$%~&*()' (Conf: 0.79)
 Box 3: 'HellNeuralProcessing UnitU!' (Conf: 0.81)
 Box 4: 'PaddlerOCR by ZFeiQ:' (Conf: 0.95)
与PPOCRv3(左下)的对比.jpg)
六、 总结与展望
本次在 Firefly RK3566 上部署 PaddleOCR v4 的实战经历,本质上是一次在极限资源下的工程取舍(Trade-off)过程。
- 打破“版本焦虑”:虽然文档推荐旧版本,但在确认算子支持(HardSwish)的前提下,大胆尝试新版 PP-OCR v4 带来了显著的精度提升。
- 精度与速度的平衡:放弃理论更快的 INT8 量化,选择 FP16,以极微小的速度代价换取了“零校准成本”和“PC 级的一致性精度”,这对项目快速落地至关重要。
- 软件工程的价值:通过重写代码移除 OpenCV 依赖、手动固化 ONNX 维度,我们硬生生在 1GB 内存的板子上挤出了运行大模型的空间。
最终成果:ZFeiQ 聊天软件现在具备了完全离线、毫秒级响应、高达 99% 准确率的中文 OCR 能力。这证明了只要优化得当,低算力国产芯片也能承载现代化的 AI 应用。
后续优化方向:
- 将 OCR 推理放入独立线程,避免阻塞 UI 主线程。
- 添加剪贴板监听功能,实现“复制图片即识别”。